Thursday, April 19, 2012

Spring headbands with Irish flowers

Retro Golden Spring Headband
Let me introduce you to my latest little project. I used a Drops Design pattern as a foundation, and added a twist or two of my own as I always do just to make it an original. Each headband is different then the other, be it a use of a different color or the flowers in different sizes and color combinations. I decided to make each a unique piece. Just like the winter headbands, I wanted to make every one just as special as their current and future owners. 
I also took some time to familiarize myself with basic photography. According to my sister who is a hobby photographer: "It was about time!". Too tell you the truth, I always thought my pictures were quite fine. Until I checked out how the girls on Etsy do it. And then I realized ......I suck! 
My photographs don't do my crochet justice, and that just wont do! 
Of course, once you learn to snap a fairly good photo, you still aren't finished, as I innocently thought....That just opens the doors to........ Photoshop! Once I was convinced that Photoshop isn't evil, and not used only to make those gorgeous models look even better, and to hide blemishes and red eyes on family photos I got down to business. What I was most interested to learn was how the get a bunch of photos into one, like a compilation, and to be honest, that's as far as I got with my newly acquired  Photoshop wisdom. Enough for now if you ask me. 
When I started I focused on learning crochet techniques so I can design my own patterns, and thought that being a good crocheter was enough. Now I see to have success with crochet, and a satisfied audience, you need to be a programer, photographer, web designer, etc and the crochet part is what you have the least time for.....
So you will excuse me for posting rarely...It's just that, I still spend most my time crocheting, and the technical wait for me to be "in the mood".
I'm more active with posting my work on DeviantArt, so you can always pop in there, and check it out. 
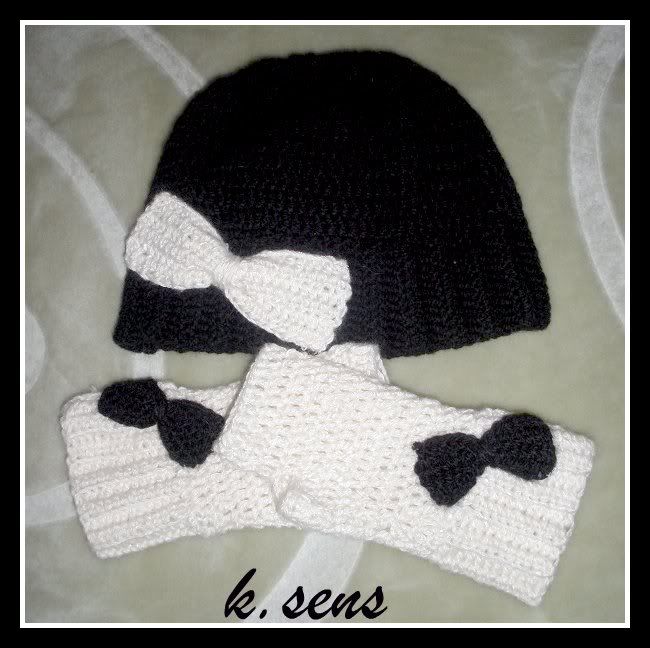
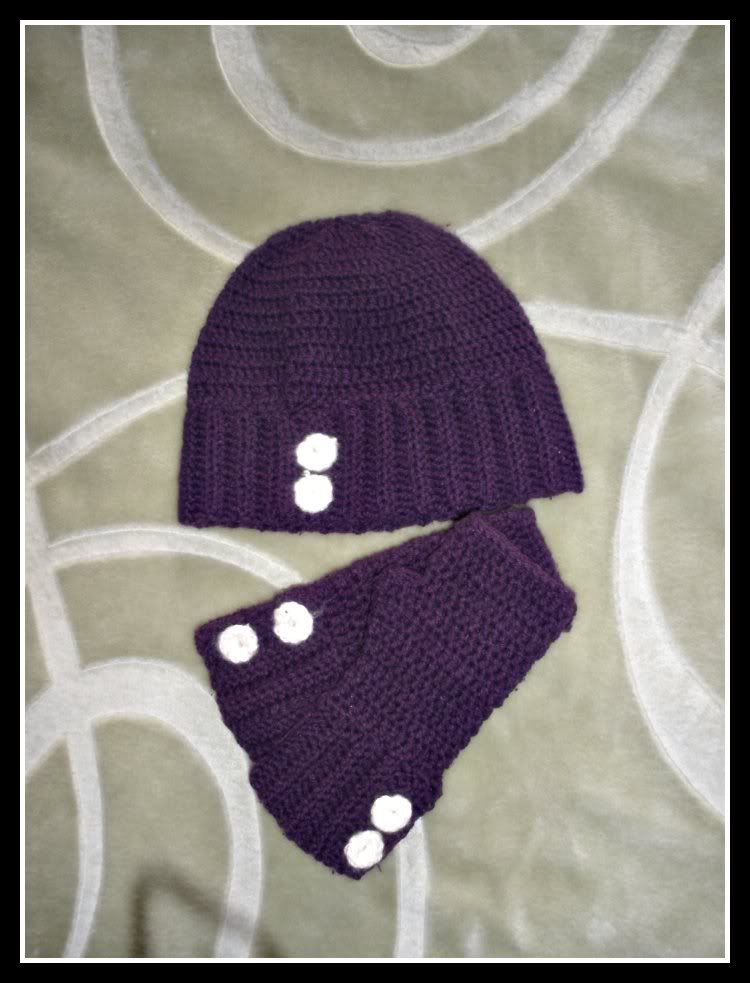
Until next time....hope you like my new photos, and enjoy the Spring Headbands!


"Olive"

"Sunkissed"

"Funky Turquoise"


Friday, April 6, 2012

Irish Flowers - free pattern

Some may already know this, but for all that don't you can also find my work on Deviant Art. I post photos there more regularly than here, so anyone interested should drop by there once in a while to check out new stuff. 
I'm mentioning this because that's what lead to this post, namely, I was asked by a fellow Deviant for a pattern for my little Irish flowers. Since I only posted the Croatian version on my original page it's only fair to post a translation  as well. 
Just to remind you all, as I said in my very first post in this blog, feel free to ask me for any pattern you'd  like a translation of, I'd be happy to post it here as well. 


So not to dwell much longer, here is the Irish flower pattern:
Worked in the round with hook size 3.5 mm/E/4. Ch 5 and form a ring with 1 sl st in 1st ch. 
ROUND 1: ch 1, * 1 sc in ch-ring, 3 ch *, repeat from *-* a total of 6 times, finish with 1 sl st in 1st sc from beg of round = 6 sc and 6 ch-spaces. 
ROUND 2: Crochet as follows in every ch-space: 1 sc, 3 dc, 1 sc. Finish round with 1 sl st in 1st sc from beg of round = 6 leaves, turn piece - work next round on the back of the flower. 
ROUND 3: ch 1, 1 sc in 1st sc from 1st round, * ch 4, 1 sc in next sc from 1st round *, repeat from *-* a total of 5 times, finish with ch 4 and 1 sl st in 1st sc from beg of round = 6 sc and 6 ch-spaces, turn piece – work next round on the front of flower.
ROUND 4: Work as follows in every ch-space from 3rd round: 1 sc, 5 dc, 1 sc. Finish round with 1 sl st in 1st sc from beg of round = 6 leaves, turn piece - work next round on the back of the flower. 
ROUND 5: ch 1, 1 sc in 1st sc from 3rd round, * ch 5, 1 sc in next sc from 3rd round *, repeat from *-* a total of 5 times, finish with ch 5 and 1 sl st in 1st sc from beg of round = 6 sc and 6 ch-spaces, turn piece – work next round from the front of flower.
ROUND 6: Crochet as follows in every ch-space: 1 sc, 7 dc, 1 sc. Finish round with 1 sl st in 1st sc from beg of round = 6 leaves, fasten off. 


If you want different colors just attach the new color thread when working on the back of flower (round 3 or round 5).
If you want a smaller flower, use smaller hook and yarn, or just make it up to round 4, or even just round 2 for a simple little flower. 

Sunday, March 11, 2012

Dođi, vidi, heklaj: And the Big Bow Headband goes tooooo........

Dođi, vidi, heklaj: And the Big Bow Headband goes tooooo........:

Crochet hat and fingerles gloves with ribbed edge


This is the most popular hat pattern on my original blog, and it would be just wrong not to allow a translation of it here as well, so I took few moments to add this free pattern. 
I also added the pattern for fingerless gloves to match the hat. Hope you'll enjoy it!

Use hook size 4 mm
TIPPS:
- Replace first hdc on row with ch 2, finish row with 1 hdc in 2nd ch from beg of previous row. 
- Replace first dc on round with ch 3 and finish round with 1 sl st in 3rd ch from beg of round.
Replace first sc on round with ch 1 and finish round with 1 sl st in ch from beg of round.
- CROCHET DC TOG:
Work 1 dc, but wait with the last pull-through (= 2 sts on hook), work next dc, but when doing the last pull-through pull thread through all sts on hook = 1 dec dc.
- CROCHET SC TOG:
Work 1 sc, but wait with the last pull-through, work next sc and pull thread through both sts on hook.


Hat
Start crocheting from the edge, not the top of the hat as follows:
Ch 14 and work first row as follows: 

- 1 hdc in 3rd ch from hook, 1 hdc in each of the next 11 ch = 13 hdc, turn piece. See CROCHET INFO-1. 
- continue with 1 hdc in each hdc but work each hdc in the back loop of st (i.e. not through the whole st) = rib-structure. 
When piece measures 52-56 cm / 20½"-22" make 2 buttonholes as follows: work 3 hdc, ch 2, skip 2 sts, 3 hdc, ch 2, skip 2 sts, 1 hdc in each of the last 3 sts, turn piece. Work 1 hdc in each hdc and 2 hdc in each ch space = 13 hdc, cut and fasten thread. 

HAT:
Slip the edge tog to a ring with the 2 rows on the side with buttonholes sitting over the 2 rows the opposite side = buttonhole split. See CROCHET INFO-2. Beg by buttonhole split and crochet alternately 1 and 2 sc in each row all the way round NOTE: by buttonhole split crochet through both layers = approx 78-84 sc. Continue with 1 dc in each st, AT THE SAME TIME adjust no of sts to 80-88 dc by crochet 2 dc in 1 st with regular intervals. 
After 4 rounds with dc (piece now measures approx 11 cm / 4 3/8'') dec 8 dc evenly, i.e. work every 9th and 10th dc tog in Size XS/S and every 10th and 11th dc tog in Size M/L – see above. Repeat the dec on every other round a total of 5 times and then on every round a total of 1-2 times = 32-32 dc left. Now work 2 rounds with sc, AT THE SAME TIME work 2 sc tog all the way round on both rounds = 8-8 sc left. Cut the thread, pull it through remaining sts, tighten tog and fasten. Hat measures approx 23-24 cm / 9"-9½''. Sew buttons to the edge.


Fingerless gloves
Cuff:

- Ch 14 and work first row as follows: 1 hdc in 3rd ch from hook, 1 hdc in each of the next 11 ch = 13 hdc, turn piece. 
- Continue with 1 hdc in each hdc but work each hdc in the back loop of st (in.e. not through the whole st) = rib-structure. 
- When piece measures 20-22 cm / 8"-8 3/4" make 2 buttonholes as follows: work 3 hdc, ch 2, skip 2 sts, 3 hdc, ch 2, skip 2 sts, 1 hdc in each of the last 3 sts, turn piece. 
- Work 1 hdc in each hdc and 2 hdc in each ch space = 13 hdc, cut and fasten thread. 
Insert a marker in the middle of the edge of cuff.


Glove:
- Slip the cuff tog to a ring with the 2 rows on the side with buttonholes sitting over the 2 rows the opposite side = buttonhole split. 
- Begin by marker and crochet alternately 1 and 2 sc in each row all the way round (by buttonhole split crochet through both layers = approx 30-33 sc). 
- Continue with 1 dc in each st, AT THE SAME TIME adjust no of sts to 27-30 dc by crochet 2 dc tog with regular intervals – see above. AT THE SAME TIME after 3 rounds with dc inc 1 dc for thumb each side of first st on round - inc 1 dc by working 2 dc in the same st. 
- Repeat the inc each side of this st on every round a total of 4-5 times = 35-40 dc on round (thumb sts = 9-11 dc). 
- Work next round as follows: 1 sl st in each of the 6-7 first dc on beg of round, 3 ch (= 1 dc), then 1 dc in each of the next 25-28 dc, 1 ch and finish with 1 sl st in 3rd ch from beg of round = 26-29 dc and 1 ch on round. 
- On next round work 1 dc in each dc and 1 dc in ch at the end of round = 27-30 dc. 
- Continue with dc in the round until mitten measures 17-20 cm / 6 3/4"-8" from cuff (3 cm / 1" remain, try mitten on for correct measurements).


I added some crocheted buttons one some sets, and bows on others just to spice it up. You can also use standard buttons and just sew them on. 


The pattern is NOT my design, it's a pattern from Garnstudio - DROPS Design. I just made the gloves fingerless and not mittens, but you can make the whole mitten from their pattern. The hat is made from their exact instructions. I made them a little shorter, but you can always check the pattern out on their site if you need additional help.

Tuesday, February 28, 2012

SPRING GIVEAWAY!


Greetings dear readers!
The time has arrived to get busy with spring woolly projects, sunnier colors and lighter materials. It's time to clear out some space and make room for new stuff, and thus get rid of the winter  ware. What to do with the winter woolly wonders that didn't find a happy home this winter? Well we'll give them another chance, what else!??!
Hence, the idea of a SPRING GIVEAWAY! It's purpose will be to give homes to the remaining winter woolly wonders, so that everybody gets a fare chance!


What better to start with then the most popular item this winter:
THE EXTRA WIDE WINTER HEADBAND WITH A BIG BOW!


The item in question is a black headband, 10,5cm wide, for head size 55 - 58 cm. 
Material: Duetto wool, 50% wool, 50% acrylic fibre (thus washable in washing machines). 


What to do to become eligible to become the proud owner of this beautiful headband? Well it's simple:

1. Click on the LIKE button on FB page Wooly Folk, if you haven't already, off course :-).
2. After thata click the SHARE button and repost the link to this giveaway on your FB profile so I can distinguish you from everyody else and enter you int the Random widget.
3. Enjoy Wooly Folks news and oldies!

The Giveaway lasts from 27th February 2012. to Sunday the 11th March 2012.
For citizens of Croatia: the shipping costs are on me!
For other countries: the shipping costs are 5,50$ (to be payed via PayPal.

And last but not least a little reminder why you want this headband......:-))))


Monday, February 13, 2012

New Award!

I got another reward from a fellow blogger so I have to flaunt it :-).She is a dear, dear creative woman who you can find at Amalia's World. Amalia thank you, thank you, thank you! 

Now the award conditions that I write seven things about myself, and since I already wrote them when I got my last award, I'll just go over them here: I still have a female golden Cocker Spaniel that is spoiled rotten since I love spoiling those I love, I love the spring and the morning sun, but right now I am enjoying this wonderful snowy weather even if the rest of Europe is cursing it. We're used to it here and don't mind the broken shovels and coxigis .-). I still love sleeping, and even more eating, especially sour cherry's.....when combined with chocolate even moreeeee...mhmhmhm

Next, 15 of my favorite fellow bloggers who are creative, communicative a regular, and also inspire my work.  
Be sure ti pay the award forward!


Mon Petit Violon
Ivelise Feito a Mao
Yarn Over Hook
Made by Cloopco
Handstrick Flair
Bite my cake
Inna's Creations
Pfiffigstes Hakelblog
My Country Cottage Garden
Mannayah
Krupp und Bauer Hakel und Strickmode/Accessoires
A Beautiful Ramble
maya*made
Naky handmade
And last but not leased, I'm giving this award as an incentive to a now blogger who will certainly become one of the most interesting once she really digs in ;-)
My Life in Cashmere

Thank you all for the inspiration, and thank you for the time and effort you put in to share your talents and abilities, as well as the knowledge and secrets of your trades 
with the rest of us!!!!xoxo


Sunday, January 29, 2012

Lavander Slippers/City Shoes - free crochet pattern


I'm back! Finally took the time to post the pattern for the Lavander Slippers! 
And, since I already posted the pictures of Lavander Slippers, here is another pair made with the same instructions: little City Shoes.
City Shoes
Stitches used:
sc =single stitch
dc = double stitch
hdc = half double stitch

ss = slip stitch
cg = closing gap
sj = special join

Joining rounds
At the end of every round you can join stitches with a simple slip stitch, or use the special join (here is a video tutorial of the sj - Special Join)

Closing gap = cg

Insert hook through the ss before the 1st turn, insert hook through the st the ss was worked into on the side of the foot, yarn over hook, draw through two loops on hook. 

Make a chain of 19loops loosely.
Round 1 (wrong side):  1dc into 2nd ch from hook, 16sc, 3sc in last ch. Do not turn, work down other side of chain, 16sc, 2sc in same ch as first sc of round, sj. TURN. (38sc)
Round 2: 1ch, 1 sc in first st, 2sc in next st, 16sc, (2sc in next st) x 3, 16sc, 2sc in next st, 1 sc in next st (the same space as the first sc of the rnd), sj. TURN. (44sc)
Round 3: 1ch, 44sc, sj in top of first sc of round, TURN. (44sc)
Round 4: 1ch, (2sc in next st) x 3, 16dc, (2sc in next st) x 6, 16sc, (2sc in next st) x 3, sj. TURN. (56 sc)
Round 5-7: 1ch, 56sc, sj. TURN. (56sc)
Round 8: 1ch, 20sc, dec 8, ss in next st, TURN, 1ch, ss in last ss, 8sc, ss in next st, TURN, 1ch, ss in last ss, 8sc, cg, 20 sc, sj. TURN.
Round 9: 1ch, 28sc, cg, 20sc, sj. TURN.(48sc)
Round 10: 1ch, 16sc, dec 8, ss in next st, TURN, 1ch, ss in last ss, 8sc, ss in next st, TURN, 1ch, ss in last ss, 8sc, cg, 16 sc, sj. TURN.
Round 11: 1ch, 24sc, cg, 16sc, sj. TURN. (40sc).
Round 12: 1ch, 12sc, dec 8, ss in next st, TURN, 1ch, ss in last ss, 8sc, ss in next st, TURN, 1ch, ss in last ss, 8sc, cg, 20sc, sj. TURN.
Round 13: 1ch, 20dc, cg, 12dc, sj. TURN. (32sc)
Round 14: 1 ch, 32sc, sj, cut the remaining thread and fasten off.

Flap:
1. Join thread (wool) at the "wrong" side on the first stitch, where you started th dec 8, on round 11, and make a a single stitch AROUND every dec stitch from that round = 8 sc, TURN.
2. 1 ch, 2 hdc in first sc from previous round, 6 hdc, 2 hdc in last sc from previous round. TURN
3. 1 ch, 2 hdc in first sc hdc form previous round, 6 hdc, 2 hdc in last hdc from previous round. TURN
4.  1 ch, 1 hdc in each stitch from previous round until flap measures as long as you want it to.
In the end turn the flap over and fasten it to the shoe with a fancy button or just saw it to fixate it nicely.
City Shoes
Hope you find the instructions helpful, if you have any questions or suggesstions feel free to comment or contact me on my email or on Facebook.